
Hello friends!! Sorry I have been M.I.A. for a while now. When I started this blog/ YouTube idea on all my favorite things, my youngest had just turned 1 and my older daughter was in kindergarten. For some reason, I had the crazy idea that I had time to work on this at night. The problem with this was that once we transitioned Elise out of her crib, she needed me to lay with her till she fell asleep. Which quickly turned into me falling to sleep on the floor next to her bed. I’m sure all my mom’s know about this wonderful tradition. Hence for the past 2 years I have been sleeping on the floor in my girl’s room instead of working in my craft room and sharing all the things with you. Fast forward to now having a 3 and 7-year-old, I’m still occasionally sleeping on the floor in my girl’s room. But I am trying to get back to my craft room and share more with you. So today’s topic is hooping a shirt for machine embroidery.
Top issues when hooping a shirt
The item I make the most with my Brother PE770 (PE800) embroidery machine is shirts for kids. I went through a lot of trial and error of trying to figure this out. There is first the option in what to use as a stabilizer. Then deciding whether to float the shirt or actually hoop it. Lastly, when I first started, I had a lot of trouble making sure that the design didn’t end up crooked.
The Best Stabilizer for Knit Shirts
I found that the best stabilizer for knit shirts is actually a combination of cut-away and tear-away. First, I was using medium weight cut-away and I had trouble keeping everything in place while trying to hoop. Also, I didn’t like how you could see the stabilizer through the shirt when finished. This was mainly a problem with white shirts. So then I discovered no show poly-mesh cut-away stabilizer. There are two things that I love about it, first is you can’t see it through a white shirt. Second, it is fusible so I can iron it on to the back of the shirt and don’t have to worry about it shifting place while trying to hoop. The poly-mesh stabilizer is a little thin so I decided to add a layer of fusible tear-away on top. This gives it a little extra stabilization while stitching.
Placement
The key things you need to get perfect placement while hooping a shirt for machine embroidery are:
- Iron
- The grid that comes with the hoop you are using
- Disappearing ink fabric marker
- Ruler
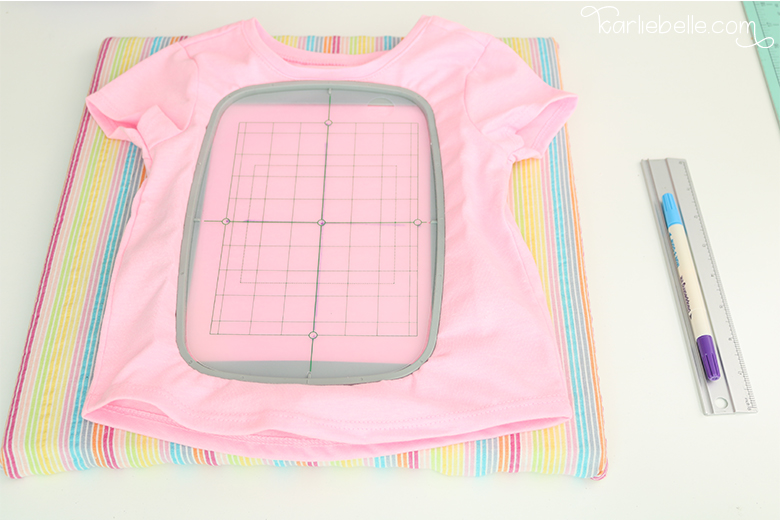
First, you should always iron the shirt to get out any wrinkles. Do this before trying to figure out the placement of your embroidery design. Use a ruler to find the middle of the shirt and place the top of the grid about 2 inches down from the collar.


Then use the fabric marker to mark the dots within the grid.

Next, use a ruler to draw crosshairs on the shirt.

That’s it!! These simple steps will help you to determine correct placement on a shirt every time.
Add Stabilizer
Once you have made your placement marks, turn the shirt inside out to then add stabilizer. First I add a piece of poly-mesh that is slightly bigger than the sewing field of the hoop. If you are using a white shirt it will be easy to see the marks from the fabric marker to make sure you are ironing the stabilizer in the right spot. If you are using a darker color shirt, just use a bigger piece of poly-mesh to make sure the entire sewing field of the hoop is covered.

Next, use a piece of fusible tear-away that is one inch larger than your hoop on all sides. Iron on top of the poly-mesh.

Hooping a Shirt
Now that you are done with your placement marks and adding the stabilizer, it is now time to actually hoop the shirt. Turn the shirt back right-side out. Pass an iron on the shirt to make sure everything is smooth. Place the outer part of the hoop on the inside of the shirt.

Next, snap the grid on the inner part of the hoop and place it on top of the crosshair marks on your shirt.

Move the outer and inner hoop pieces until the grid lines up with your placement marks and then push the top inner hoop down to snap into the outer hoop.
Add a Topper
After I am done hooping a shirt I always like to add a water soluble topper to the shirt. This prevents the threads from sinking down into the material. Just cut a piece that is the size of the inner hoop and pin it to the shirt and stabilizer. Just make sure you pin it outside of the sewing field so your needle doesn’t accidentally hit the pins.

How to Keep Fabric Out of the Way on a Single Needle Embroidery Machine
One of the biggest hurdles when using a single needle embroidery machine is to keep all the extra fabric out of the way of the needle. Also, you need to make sure that you do not allow anything to get folded under the hoop and accidentally sew the shirt to itself. I’ve done this more times than I would like to admit LOL.

After you are finished hooping the shirt, turn the shirt inside out. For toddler shirts size 2-3T and up, I use masking/ painters tape to keep the sewing field clear of any excess material. Gather the fabric and add the tape to roll around it and then back to the underside of the hoop. I try to keep the tape right outside of the sewing field on the underneath. This is so that the adhesive from the tape doesn’t cause your needle to jam up.

Video Tutorial
Along with trying to get back to writing here, I am also trying to make more videos to go along with each post to give you a visual on how I do things 🙂 Please check out my YouTube Channel and subscribe!
If you have more questions please join my Facebook group for embroidery and vinyl crafts discussion and motivation.
Other Machine Embroidery posts you might like:
How to Get Started with Machine Embroidery: Supplies you will need
Brother PE800 Embroidery Machine Unboxing and Setup
Embrilliance Embroidery Software: The Best Program for Beginners
All About Stabilizers for Machine Embroidery
My Favorite Places to Buy Embroidery Designs
How to add a Name to a Baby Blanket
How to Hoop and Embroider a Baby Onesie
Applique Tutorial from Start to Finish
How to Cut Applique Fabric using Silhouette Cameo
How to use 5×12 Multi-position Hoop
How I Built my Sewing and Craft Desk (with mini craft room tour)
How I organize Fabric and Blank Clothing


I hope today’s post helped you with understanding how to hoop a shirt for machine embroidery. If you have any suggestions for hooping methods that you like to use, please share them in the comments below.
Thanks,

The post contains affiliate links and I will receive a small commission if you make a purchase after clicking on my link. All opinions are my own and I only promote products that I use and love.


I’m glad to see you are back! Because of your blog, I bought an embroidery machine. I like having it, but need to use it more. Thanks for this hooping post.
Thanks so much Candice!!
Thanks so much for sharing your clear and helpful embroidery advice. I am new to machine embroidery and just loving all the tips on your page.
Thanks so much Elizabeth! Please let me know if you have any specific questions!
LOVE your YouTube videos! I am just giving machine embroidery a second chance. You are the first person to truly help me understand what I was doing wrong and how to do it correctly. PLEASE do more videos!
Thank you sooo much! I’m working on more videos but if you haven’t already, join my new facebook group. I’m posting short videos on things people are asking about so let me know if you need help with anything specific 🙂