
Hey guys! My last post was all about how to hoop a shirt, so today lets talk about what to do next. There are two main groups of designs for machine embroidery; embroidery only designs and applique. Embroidery only designs are just what they say, thread only. Applique, however, involves covering some of your shirt with another piece of fabric, then embroidering the edges of that fabric. I love both kinds, but what makes applique really fun is the incorporation of pretty fabric combinations. Today I will be discussing how to buy a design online, use Embrilliance Essentials to personalize and modify the design, then an applique tutorial video.
Gather Supplies
For todays project I will be using my Brother PE770/PE800 Embroidery machine and the 5″x7″ hoop that comes with the machine. You will also need the following supplies:
- Shirt or other garment already hooped (see previous post on how to hoop)
- Applique Design in the format that your embroidery machine uses (Brother and BabyLock use .PES format and here is a previous post on where I buy embroidery designs)
- Embrilliance Essentials Software
- Embroidery Thread (see previous post on what supplies I use)
- Fusible Polymesh Cut Away Stabilizer
- Fusible Tear Away Stabilizer
- Disappearing Ink Fabric Marker
- Water Soluble Topper
- Pins
- Fabric
- Heat N Bond Lite
- Iron
- Embroidery Snips for trimming applique
- Fusible Over the Back Cover Up to prevent threads inside of the shirt from rubbing against skin
- Tide Pen to remove any placement marks
- Spray bottle of water to remove any remaining water-soluble topper
Buying an Applique Design and Opening it in Embrilliance Essentials
In order to personalize any embroidery designs you purchase online, you will need to purchase embroidery software. I recommend Embrilliance Essentials. Here is a post further explaining why I love Embrilliance. In this program you will be able to open the design, resize it if necessary, set the placement in the hoop, and add a name. If you would like to try the program out, there is a free trial you can download, but you will not be able to save your work and put it on your embroidery machine.
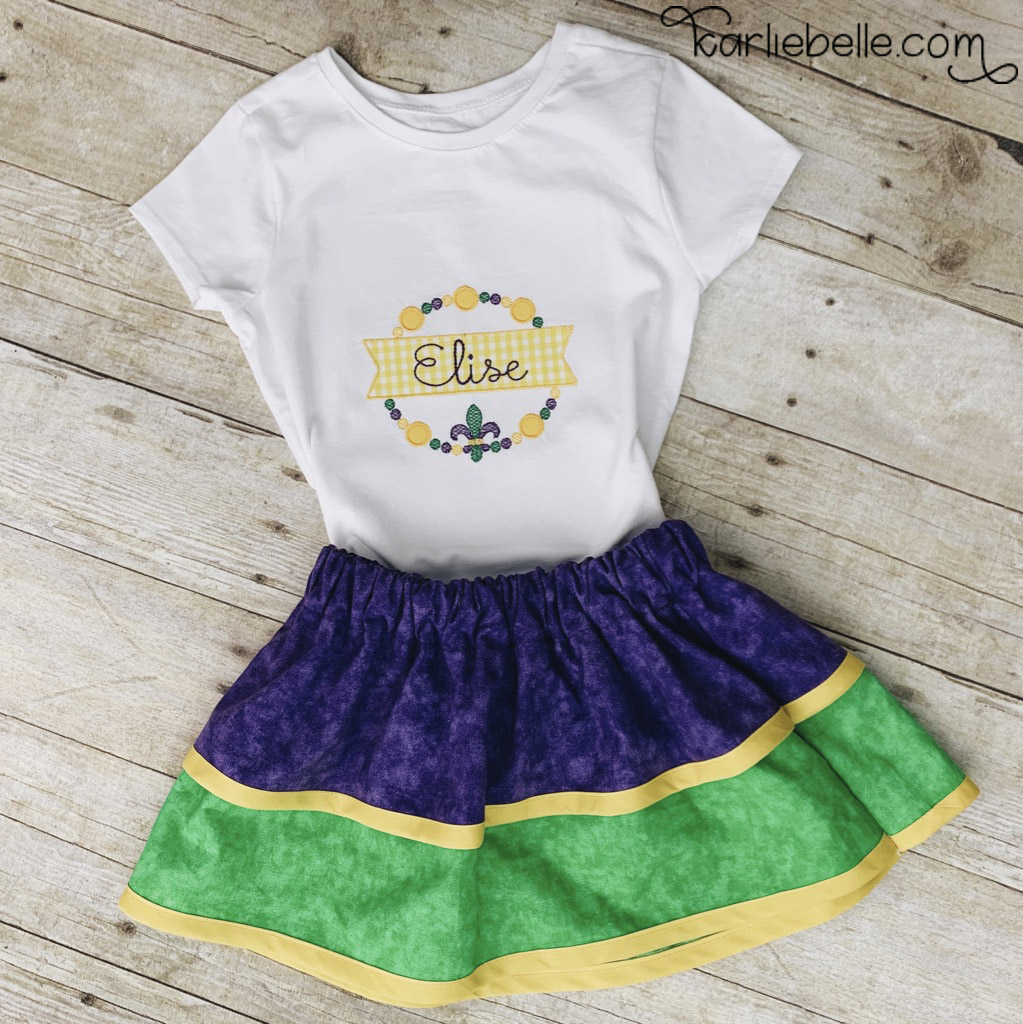
Today I am using a design I purchase from Embroidery Boutique. I am also using a font that I purchased from Jolston’s Designs. I purchased both the design and font and downloaded them to my computer.
Next I opened both my downloads folder and Embrilliance Essentials on my computer. I found the the .PES file in the size that I wanted (5×7) and dragged and dropped the file into the Embrilliance window. This automatically opens the file. I then did the same for the .BX file of the font. This will install the font, and from now on you just have to click the text icon at the top of the screen to access that font in the future.


Once my design was in the right place, I added my daughter’s name in the banner.

Ready to Stitch and Applique Tutorial
I saved the design as a .PES file and put it on my flash drive. Next I plugged the flash drive into my embroidery machine and opened up my appliqué design. I start stitching out the design and change thread colors for each step as needed.

When its time for the appliqué steps, there are 3 different steps: the placement stitch, the tack-down stitch, then the finishing zigzag or satin stitch. First, I like to do the placement stitches for all of the appliqué pieces on the design. Next I take the hoop off the the machine and use the placement stitch as a guide to how big of a piece of fabric I need to cut. Once I cut all my fabric for the appliqué pieces, I cut a piece of Heat N Bond Lite to fit each piece of fabric and iron it on the back. This will keep your appliqué fabric from bunching or puckering later and give you a nice smooth finish.

After you iron on the Heat N Bond Lite, allow it to cool and remove the paper backing. You should then see a glossy finish to the fabric.

Put the hoop back on the machine and place your fabric on top the placement stitch. Make sure the fabric covers the area completely and the glossy side is down.

Stitch the next step which is the tack-down stitch. You can CAREFULLY hold you fabric while doing this stitch to make sure it stays in place and is flat and doesn’t bubble.
When the tack-down stitch is done, remove the hoop from the machine. Now you will need appliqué scissors to trim the excess fabric as close to the tack-down stitch as possible without snipping it.


Once the fabric is trimmed, place hoop back on machine and do the final step which is the zigzag or satin stitch. Repeat placement, tack-down, and finishing stitch for each piece of appliqué.


Cleaning and Finishing Up

When the design is finished stitching, remove hoop from machine. Cut any jump stitches and remove water soluble topper by tearing away. Spray water on any remnant pieces. Turn garment inside out and tear away stabilizer leaving polymesh still in place.

I always like to cover the inside of the shirt with a fusible over the back cover up (sometimes called tender touch). This protects baby’s and kid’s skin from the scratchy threads.

Lastly I turn the shirt right side out and use a tide pen to remove any marks left from the placement marker. Then I iron the front of the shirt while using parchment paper to protect the design from the iron. This helps smooth any hoop marks or bunching, and helps activate the heat n bond that was on the back of the fabric.

Video Applique Tutorial
As with most of my tutorials, here is a video to show you step by step instructions.
If you enjoy my videos, please remember to give it a THUMBS UP and click subscribe.
If you are searching for a place where you can ask questions about embroidery anytime, please join my Facebook group. Karlie Belle Beginner Machine Embroidery and Silhouette Craft Group
Other Machine Embroidery posts you might like:
Brother PE800 Embroidery Machine Unboxing and Setup
How to Get Started with Machine Embroidery: Supplies you will need
Embrilliance Embroidery Software: The Best Program for Beginners
All About Stabilizers for Machine Embroidery
How to Hoop and Embroider a Baby Onesie
Hooping a Shirt for Machine Embroidery
How to Cut Applique Fabric using Silhouette Cameo
How to add a Name to a Baby Blanket
How to use 5×12 Multi-position Hoop
How I organize Fabric and Blank Clothing
My Favorite Places to Buy Embroidery Designs
How I Built my Sewing and Craft Desk (with mini craft room tour)


Thank you so much for stopping by today. I hope this applique tutorial post helped you! If you have any questions please leave them in the comments below.
Thanks,

The post contains affiliate links and I will receive a small commission if you make a purchase after clicking on my link. All opinions are my own and I only promote products that I use and love.


This tutorial is absolutely fantastic, Karlie! Your step-by-step instructions were easy to follow, and the tips you included made a huge difference in my project. I can’t wait to try out more designs! Thank you for sharing your expertise!